Showing posts with label Childrens Clothing. Show all posts

Sunday, October 16, 2011

Like I need a new hobby!

Many years ago, I bought a couple needle tatting books and needles.
When I say many, I mean like 11-15 years.
Well, I read the books and practiced a little but put the
supplies away and never looked at them again until about
3 days ago.

Don't know what I saw that reminded me I had those supplies
put away but I dug them out and thought of all the pretty
trim I could be tatting for some of the clothing
I have been making for my nieces.

I sat down and got to work on a lace collar edging.
(You can just go ahead and ignore that pilled up blanket!)


It amazes me what you can make with just a needle and thread!
Ain't it purdy?


Now it's not perfect by any means but, I think for my very
first tatting project, it's not too bad.


This is the finished product.


It took me two days to finish this piece.

I still need to read up on how to starch it or iron it or whatever
it is I need to do to make it all nice and crisp.

I am going to put this on a top I already have planned out to make but
I would also like to make the girls holiday dresses that incorporate
some tatting.  
Let's see what I can come up with!


Until next time, 

Thursday, October 13, 2011

First Peasant Top

I've have admired all the peasant tops I have seen on other's blogs and 
thought it was high time I made on myself.  

I wanted a top to match the orange pants
I blogged about a week or so ago.

This was the only fabric I had on hand that matched
the pants material perfectly.


I wanted to make the top with long sleeves but
unfortunately only had enough fabric to
make this length sleeve.

Still need to hem the pants but, pair this up with
a white turtleneck and a pair of black mary jane's
and I think it will look cute on
one of the girls!


Until next time, 

Tuesday, October 4, 2011

EZ Patterns Pants

I purchased the "EZ Patterns" complete set back in 2007 off E-bay 
when you could instantly download patterns off the site.

I had only made a jumper from the pattern set and forgot about
them until I was looking to sew a pair of pants for the
Halloween top I had made my 2 year old niece.

Since it had been a while since my last project with these
patterns, I thought I would document the process as I went along
and give my review of the e-pattern.

I am making a size 2 pair of pants.

Here goes:
(Click on the pictures to enlarge.)

The pattern, if that is what you want to call it, consisted of well written
instructions and a crotch template that you print out.

The instructions tell you to cut two pieces of material 
19.5 x 21.75 inches for the size 2.

Then you fold that rectangle in half, long edges together.

Take the crotch template and place it along the long cut
edges and the top of your rectangle, like so.
Note: I turned my rectangle of fabric so that it was
easier to work with.

Then cut around the template.
When finished, this is what it looked like.

Next you will do the same steps for the other rectangle of fabric.

When done, you unfold the pieces and place them 
right sides together and pin, like pictured below.

This pattern called for 1/2 inch seam allowances.
I sewed the two pinned areas together as directed.

The pattern said to sew reinforcement stitches along
the curved crotch area and then clip to 1/8 inch.
I chose to clip my entire seam to 1/4 inch and overcast
the entire length on my sewing machine.


After this the instructions said to open out the pant legs and sew from the bottom 
of one leg, up and around the crotch and down the other leg. Again, I trimmed 
the seam and overcast it although the instructions did not say to do so.

The casing for the elastic waist was next.
I folded up and pressed 1/4 inch. When finished, I folded up another
3/4 inch and stitched close to the folded edge. I left about  1 1/2 inches unstitched
so that I could insert the elastic.   

At this point I clipped a safety pin to the end
of the elastic and threaded it through the casing.  I overlapped the ends
by 1/2 an inch and stitched them together.


To finish off the waist, I stitched the opening that I  used to insert the elastic closed.


To finish up, I hemmed the pants, first folding under 1/4 inch on each leg and pressing with the iron.
Then I  folded up another 1/2 inch, pressed and  
stitched close to the folded, pressed edge.
That completed the pants!

As you can tell from the picture above, the legs on these pants are enormous!
They are as big around as the waist is.

All in all, I would say that the instructions to the EZ Patterns pants
 were very well written but the finished product just doesn't cut it.  
Maybe if you were looking for the boutique style wide legs
 they would work but I still think they are huge for that style also. 

I didn't want to trash pile them after all that work so I decided to add a full
ruffle to the bottom of the legs.  My hope was to make them look like boutique pants.
(You know this is going to end badly, don't you!?  Just admit it!)

I didn't want a lot of bulk around the legs so I decided one ruffle would do.
I wanted to incorporate the lime green and orange from the top so I banded
the main fabric with those colors.

First I cut two strips of the main fabric and two strips of orange at 4 inches.
I cut the length of the strip at 19 inches which was double the circumference of 
the pant legs plus 1/2 inch seam allowances.
For the lime green I used the same bias tape I used in the top.

I folded the orange fabric in half (one on the left) and pressed.
I then folded each edge to the inside center fold and pressed again.
This created a band that was 1 inch wide.

Stitched the lime green bias tape on the top edge of my main fabric 
and the orange binding at the bottom edge.
I then sewed the short ends together with a 1/2 inch seam.

As I had already sewn the seams of the pants shut and overcast them, 
I had to come up with another way to attach the ruffles. 

What I did was take elastic and cut it to the circumference of the pant leg 
and sewed it into a circle. I divided the elastic and fabric strip into 
fourths and pinned them together at the marks.
  

Lining up the elastic band 1 inch beneath the lime green bias tape,
I zigzag stitched the the elastic to the fabric while pulling it taught to fit the 
circumference of the fabric. I didn't want to stitch the elasticized ruffle to 
the pants itself (in case I didn't like them on there) 
so I used 8 safety pins to temporarily hold it in place. 

This was the finished result!
Enormous pant legs with clown like ruffles!

I will remove the ruffle and these can be play pants for around the house
 or maybe even pajama bottoms!
I will rework these pants to see if I can taper
the legs in to a decent size. I do like the roominess in the
seat area though as my niece is still in diapers.


Well, back to the sewing room!


Until next time, 

Sunday, October 2, 2011

Pleated Top

Have I mentioned lately that I love the blog Craftiness is not optional?
I sometimes feel like a stalker as I check the site several times a 
day just to make sure I am not missing a new post.


Anyway, I just adore the tutorials that Jess has posted on her blog
and plan to make many more of her projects.

Today I have made her pleated top.

Although everything went together well and the tutorial was easy to follow,
I am not too happy with my fabric selection.
Because the flowers are in a vertical row, it doesn't show off
the pleats as well as I would like.


I love the way it buttons up the back and may just have to add
some buttons to the front also.  That just may make those
pleats stand out a little more predominately. 

The only variation I made to the original tut was to add 3/4 length sleeves. 
The tutorial was for a sleeveless top with the arms bound with bias tape.
Super cute for hot, sunny days but, it is definitely not summer in Ohio anymore.
It has rained almost all day long and the temperature is in the mid-forties.

On second thought, I should have made this top out of fleece!
Oh well, maybe the next one.
I plan on pairing this top with brown leggings that I have
already purchased for my great niece, Korallynne.


Sorry for the terrible photos.
It is after midnight and the energy saving bulbs we use don't make
for good picture taking.


Until next time, 

Thursday, September 22, 2011

The Libby Top Sew-A-Long

I am in love with the blog Craftiness Is Not Optional (aka: CINO).
Jess makes some of the cutest little girls clothing ever!
On top of that, she shares some wonderfully done tutorials on how to make them.

On Monday she started the Libby Top sew-a-long.  
It lasted three days and was a blast to participate.  
It was my first sew-a-long and certainly won't be my last, if she
posts more.  

WARNING: Crappy pictures ahead!

It was raining and overcast when I went to take my pictures.
I couldn't get a decent photo indoors as it was too dark in the house so I quickly
took my garment stand outside, plopped it down and snapped a few shots.
I didn't have time to straighten or primp the top or it would have gotten soaked
and I would have been drenched

This is my finished top.

A view of the back.

I strayed a little from the tutorial as it was written and added some piping
and bias tape to the edge of the bib portion of the bodice.
I love the dimensional quality it gives. 
I don't know if it shows up well on your screen but, 
the orange fabric is glittered. 

I also made my sleeves differently.  I followed the tutorial for measuring and cutting
but instead of adding bias tape to finish the lower sleeve edge I gathered it.
I added some more bias tape to coordinate with the bib detailing. 

I just love this little top and plan on making some black pants to match.
I am thinking of adding ruffles to the bottom of the pant legs using
the orange and print fabric from this top.

As they stitch up so quickly, I plan on making two more 
of these Libby tops for each of my great nieces.

Why not head on over to Jess's site and try one for yourself?
I promise you won't be disappointed!


Until next time, 

Friday, September 16, 2011

Junebugs Everywhere!


This morning I completed another Junebug Dress from the tutorial posted by 

As I had mentioned previously, a friend had given me a LARGE stash
of fabric a long while ago and in it were some very vintage prints.
As fall is quickly approaching here, I wanted to make a dress to
reflect the season that could also be worn well into winter.

Here is the fabric I chose.
Doesn't it just scream Autumn!

And here is my finished dress.

Although I have never sewn it before, I decided to try rick rack
around the chest flap. I love the look but wasn't to happy
with the way I sewed it on.  Need to find a tutorial on how to round 
corners with it.  I couldn't get it to lay flat so I ended up sewing it to
each side and trimming it. When I turned it right side out, 
the trim pulled in even though I clipped and trimmed the corners.

I couldn't believe I found the exact shade of trim as was in the dress.
I know it looks orange but it is more of a burnt orange color.
The buttons matched up pretty well too.

Once I had the dress completed, I felt that the bottom looked a 
little bare so I added a row of rick rack about 2.5 inches from the bottom.

As with the last Junebug dress, I made the sleeves longer and
added wide lace to them.

I am keeping my fingers crossed that this will fit my great niece, CiCi.
I enlarged it to an approximate size 4.
Although she is only 2 years old, she is, ummm...lets say a healthy
little dumpling. She is not overweight but, is fuller in the waist and
upper body than most toddlers her age.

Sorry my pictures are so bad.  The sun was shining when I started taking
them but then the clouds came in when I was finishing up.

Thanks again Jess for such a wonderful, easy to follow tut!


Until next time, 

Sunday, September 11, 2011

Junebug Dress Modeled

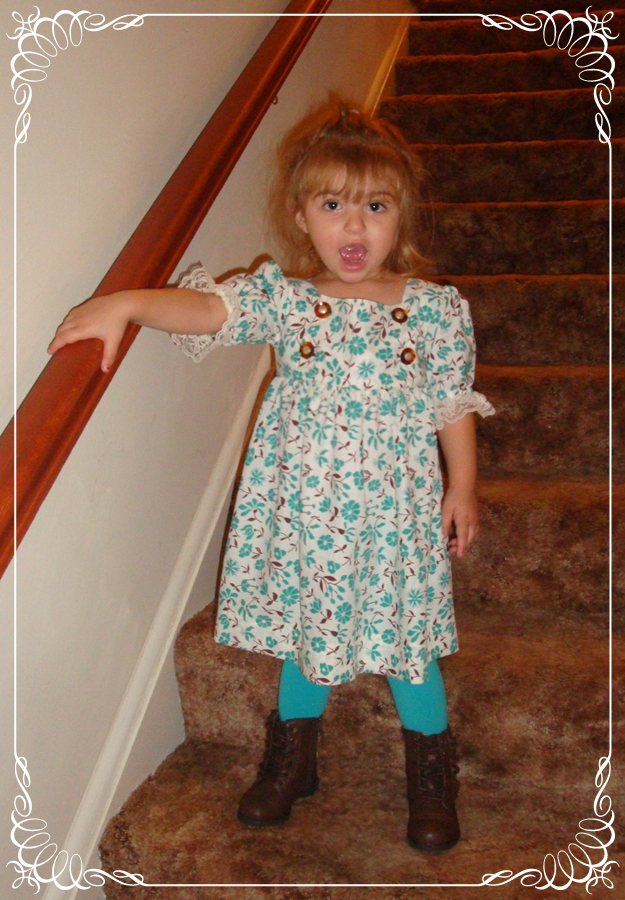
Today I presented the Junebug dress to my niece, Korallynne.
She was so excited when she saw it that she wanted it put on right away.

She was so cute and kept saying "Priddy".

She was the best little model.
This is the shot I got when I told her to turn around 
and show me the back of the dress.

I was lucky enough to find leotards that were almost the exact
shade of turquoise that is in the dress!

I was disappointed that I wasn't able to find any brown shoes. 
But, as it turned out, I'm glad I didn't because I found these brown ankle boots that were adorable.
You can't tell in the pictures but they have a leather ruffle on each side and they laced up the front.
Kind of reminds me of the "Little House on the Prairie" look.

The photo shoot didn't last very long.
When I got this look from my model, I knew it was over!
That's a two year old for you!


Until next time,