Sunday, September 11, 2011

Junebug Dress Modeled

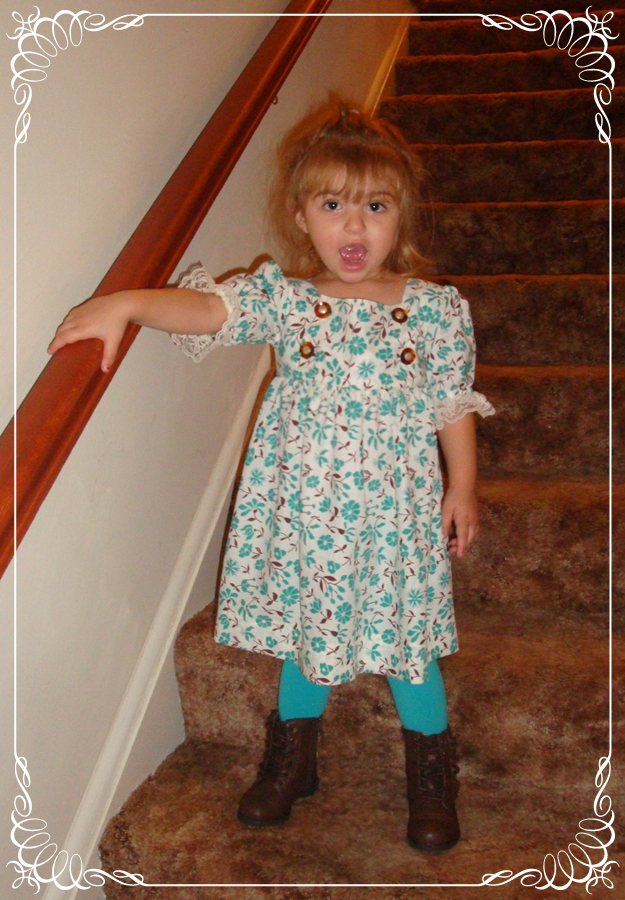
Today I presented the Junebug dress to my niece, Korallynne.
She was so excited when she saw it that she wanted it put on right away.

She was so cute and kept saying "Priddy".

She was the best little model.
This is the shot I got when I told her to turn around 
and show me the back of the dress.

I was lucky enough to find leotards that were almost the exact
shade of turquoise that is in the dress!

I was disappointed that I wasn't able to find any brown shoes. 
But, as it turned out, I'm glad I didn't because I found these brown ankle boots that were adorable.
You can't tell in the pictures but they have a leather ruffle on each side and they laced up the front.
Kind of reminds me of the "Little House on the Prairie" look.

The photo shoot didn't last very long.
When I got this look from my model, I knew it was over!
That's a two year old for you!


Until next time, 

Thursday, September 8, 2011

The Junebug Dress

Today I have finished up a Junebug Dress that I made from the tutorial posted at 
To go directly to the tutorial click here.  
While your there, check out the other great projects and tutorials as Jess has some fantastic ones!


I wanted to make a tester dress so I chose this fabric I had in my stash that a friend had
given me a long while ago. The colors are trendy but I wasn't fond of the print. 
The fabric is definitely vintage and has a lovely hand to it. 
Now that it is finished I have changed my mind and am quite fond of it!


The front has a button up flap.  
Love the fact that there are no zippers to deal with.
I absolutely hate sewing in zippers.

I used the size 2/3 pattern that Jess provided in the tutorial.
It will be going to one of my great nieces.  
Both are two years old but wear a size 3.

I changed a few things up from the original tutorial.
I made the sleeves longer as it is going into fall now 
and I added lace to the sleeves also.
I'm thinking of pairing the dress up with a brown turtle neck and the same color leggings.

I also made the skirt of the dress fuller than what the tutorial called for.
I couldn't decide on what buttons to use.  
As this was a tester dress I didn't want to have to buy anything to make it.
I scrounged through my button tin and found these vintage ones.
Although they are not the exact brown in the dress, I think they compliment
the vintage fabric and old time feel that the dress took on.

I am also going to stop calling it a tester dress now as it came out
better than I could have imagined.  For that I have Jess to thank
for such a fantastic, easy to follow, tutorial!
Thanks Jess!

I'm going to be whipping up another one real soon.
I'm thinking of all the possibilities for trims!
Ric rac around the button up flap, ribbon along the bottom, the ideas are just flowing! 


Until next time, 

Tuesday, July 12, 2011

Summer Dresses Modeled

Here are my great-nieces modeling their summer dresses I made them. 
(See the June 15th posting for details on the dress and the tutorial to make it.)
I liked the dress I made for CiCi so much that I made Korallynne one exactly like it.
They looked so adorable running around at our summer place at the lake. 
Everyone kept asking if they were twins (they aren't). 
The girls had a great time watching my sister (their Aunt Brenda) catch fish.

That's all for now!


Until next time, 

Wednesday, June 15, 2011

Summer Dress

Today I finished up this darling little dress that I made using the tutorial from living with punks.


Susan did such a fantastic job creating her picture tutorial that I had this dress done in no time at all.

I made it using fabric that a co-worker had given me a couple years back.
I had no idea what I would ever make with it as the print is so 
large but I just loved the coloring in it so I held onto it.
When I saw Susan's tutorial I knew immediately that this was the fabric I would use.
Perfect for a summer dress for a 2 year old!

If you would like to make one yourself here is the direct link: 

A first for me, I made my own seam binding.
It took me longer to make the binding than it did to finish the whole rest of the dress.
By the looks of my crooked sewing line, it appears I need a little practice sewing it on!
I think my favorite part of the dress is the ruffled neckline.


I love the top stitching at the waist line.
It gives the finished dress a high end look.

The bow is super cute, isn't it?  
I angled the ends of the ties which wasn't called for in the tutorial.
On the next dress I create, I will make the tails about 5 inches longer than what the tutorial calls for.
On Susan's finished dress she tied her tails in a loose knot rather than a bow 
so that is probably why mine are so short.

Thank you Susan! 
I couldn't be happier with this little number!


Until next time, 

Sunday, February 13, 2011

Sweet Hearts Revisited!

This is my second card for TSTR challenge this week which is Sweet Hearts.
I am soooooo very pleased with the finished result.
Ain't she pretty?

I am in love with the crochet edging I did on the vintage valentine image!

This close up shots show the detail a little better.
I just adore the crochet flowers so decided to make a rosette and add it to my creation.
My main background paper is covered in the prettiest little pink and green
butterflies so I had to add some of my own for dimension.
I cut them on my expression, distressed the edges, painted them with sparkly nail polish
and glued on some little pink pearls.
 
This card was very time consuming to make but
I think the end results were worth the effort.  

As usual, I am running behind so gotta run!
Thanks for stopping by today!


Until next time, 

Thursday, February 10, 2011

Sweet Heart

TSTR's challenge this week is Sweet Hearts.

... please create a card or project using HEARTS and any additional inspiration from the photo -- colors of pink, green, brown & neutral, doilies, polka dots, flowers, lace, ribbons ... OR ALL!


I wanted my card to be soft and feminine and I think I have accomplished that.


I had intented my card to be pink but, when printing out my paper for the background frame
of the scrollwork, it came out looking more of a mute shade of purple.
As I am low on ink for my printer I went with that color.


Once I had finished my layout it looked rather void of color so I added some lavender lace
I had in my stash and lightly dusted the white ribbon rosettes with a lavender chalk ink.
It's a shame it doesn't show up better in the pictures but, the background paper and the ribbon
I used have a glittery effect. The card is so much prettier in person.

Thanks for taking a peek today!


Until next time, 

Sunday, January 30, 2011

Winter Wonderland

Just sneaking in under the wire to post my submission to this weeks
Shabby Tea Room challenge.
Cathy chose the most beautiful winter scene as an inspiration photo
and asked that we create a project with a winter theme.


Isn't it just so lovely and peaceful?
If winter looked like this all the time I wouldn't mind it at all.

I was inspired by the beautiful colors of the photo
and made my card to reflect them.
Again, the pictures are not the best.  I must have moved this card around to
every room in the house trying to get decent lighting and these are
the best I could come up with.


I started off by using Penny Duncan's Nestie snowflake file.  Just love it! 
I then used another of her Nesties to make a backdrop for the
snowflake which is mounted with pop dots.
Satin ribbon was run through some slits I added to the Nestie.
I then mounted it all to some wonderful digital snowflake paper and then
again to digital newsprint. I zigzag stitched around the snowflake paper
in the exact shade of blue as the papers and ribbon.


I just fell in love with this trim when I saw it at Joann's. It kind of reminded
me of snow and icicles so I added it to my card along the bottom after
running some blue satin ribbon through the top part.


I added some pins and some of my homemade roses in a shade
that matches the red in the little vintage girls photo.


Then to finish it off I added a ticket with the saying "Warm and Cozy Winter Wishes".
It was secured with hemp twine and a button.

Almost forgot! I wanted some sparkle so before mounting everything, I brushed
my blue Nestie with sparkly fingernail polish. I came out awesome.


I sure hope the sparkle shows up in the above picture.
I have found so many uses for this new shade of nail polish.
I believe it is made by Wet and Wild.

I had fun with this challenge and am quite please with my card.
Hope you enjoyed viewing it also.

I am entering my creation in the
Tuesday Throwdown: Distressing challenge.

Before I go, I would like to thank the DT at TSTR for the honorable mention
on the card I created for last weeks challenge. Just thrilling to be mentioned
with the same group of ladies who's work I admire so much each week!


Until next time, 

Wednesday, January 19, 2011

You've got the cutest little baby face!

Today I have created a card for the Shabby Tea Room challenge "White and Bright".
I adore the inspiration photo as my favorite color is yellow.
We are asked to create a card/project using white and/or cream and one other color.


I kept with the inspiration photo colors using cream and yellow to make my card.


I really like the way this card finished up.
I used a couple techniques I had never tried before, first being the gathered satin ribbon.
I like the soft, feminine look it gives.
The next "new to me" technique was the kiss stamping of the background.
I will be using it again but hope I get better at it.


Next I tried my hand at wrapping the circle I cut for the picture frame in satin ribbon.
I love this look!  It gives texture and dimension without overpowering the picture.
To add more dimension, I used foam strips to raise the frame and also behind the layer
with the lace added.  To bad the camera makes the card look so flat as it is actually quite lofty.


Some dry embossing, pearls and inked edges finished it up nicely.
It's all ready to send to my nephew, Randy.

The picture is of his beautiful baby girl, Ava Belle.
Randy is in the Navy, stationed in Hawaii (poor kid).
Ava was born while he was in boot camp.
He has only seen her twice since her birth, once when he finished camp
and then right before he was shipped out.


Randy calls almost every day and speaks with Ava from his video phone.
It is so amazing to watch her respond to him. 
There is no doubt that, although they are far so far apart, she knows who her daddy is.
She is always mesmerized by his voice and doesn't take her eyes off the phone.


And lastly, here is the full picture that I used for my card.
Ava's maternal grandmother is a beginning photographer and she made these hats to use in her studio.


Okay, I lied!  Here are a couple more pix of our beautiful baby girl.


Thank's for taking a peek today!
Hope you liked the card and didn't mind my rambling about Ava.

Tuesday, January 11, 2011

'Sketch This'!

Good morning! 

It has been a long while since my last post. 
Just couldn't find the spare time during December to get into the craft room and play but today I made time!

I love following sketches and this week at The Shabby Tea Room there is a great one posted by host Pattie Goldman.


Here is my interpretation of the sketch.

I love the color combination of pink and green, it's just so fresh looking.
I was debating whether or not to distress my papers but in the end decided to go for the crisp, clean edges.


I had fun playing along this week and I hope you have enjoyed
taking a peek at my card.